MediaStorm Guide to Organizing Camera Phone Pictures with Hazel

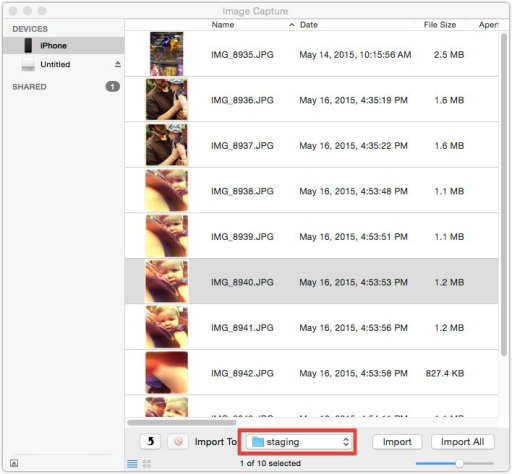
If you’re like me, you probably take lots of pictures with your phone. Organizing thousands of images can feel overwhelming. Apple has tried to makes this a seamless process with the introduction of iCloud and the new Photos app. As convenient as it is to automatically upload all your images to the cloud, Apple’s service has one glaring omission. You can not delete individual pictures. It’s an all or nothing solution. So I’ve created my own workflow. With my phone connected to my Mac, I use Apple’s built-in utility Image Capture to download all pictures to a specified folder. I make sure to delete the images from the phone as I download, ensuring that I don’t end up with duplicates. Next, I use Noodlesoft’s Hazel ($29) to automate organization. Hazel is a system utility that applies specified rules to a given folder. In this case, after I’ve downloaded my images to my…

Continue ReadingMediaStorm Guide to Organizing Camera Phone Pictures with Hazel

MediaStorm Guide to Quickly Scaling Images in Premiere Pro 2014

This article is part of a series of posts with tips and tricks from our producers' experience working with Adobe Premiere Pro CC after years of working in Final Cut Pro. To read more about why we made the switch, check out this post. Adobe Premiere Pro CC 2014 offers two ways to quickly scale a large image to the size of your sequence. To begin, add your image to the timeline, then right-click it. You’ll see two options: Scale to Frame Size and Set to Frame Size. While both options will resize your image, each does so in a slightly different manner. Scale to Frame Size changes the image Scale setting to 100%, effectively throwing out any addition resolution. If you need to further increase your image you will have to up-res it. Using Set to Frame Size will also scale your image to the sequence frame size but it does…

Continue ReadingMediaStorm Guide to Quickly Scaling Images in Premiere Pro 2014

MediaStorm Guide to using the Transparency Grid in Premiere Pro

This article is part of a series of posts with tips and tricks from our producers' experience working with Adobe Premiere Pro CC after years of working in Final Cut Pro. To read more about why we made the switch, check out this post. At MediaStorm, we are meticulous about how we crop the photographs in our films. Even so, sometimes when a picture has black edges it can be difficult to see exactly where the photograph ends and the default black background of Premiere Pro begins. Sometimes a sliver of of black slips through undetected. Recently, I stumbled across a Premiere Pro setting that makes it easier to distinguish between an image and black background, the Transparency Grid. To turn on the transparency grid, simply click the wrench in the Program Window and select Transparency Grid. The default black background will change to a grey and white checkered pattern. Notice, how…

Continue ReadingMediaStorm Guide to using the Transparency Grid in Premiere Pro

When Hard Drives Fail

For years I’ve been preaching the adage that when it comes to hard drive crashes, not only as an answer to the question, "how much storage do i need?", but also to the two types of people, those who have lost data and those who will. Well, last week it was my turn. Again. I was working at home, with all the proper protection, and still, in a single surge, two hard drives went kaput. Fortunately, thank the stars, the drives were from different projects and I had backups of each. Because let me tell you, as an editor there is no worse feeling than knowing you’ll have to redo hours, or even days, of work. What I took away from the experience is this: Unless you are backing up your work, never mount both the main and backup drives at the same time. This way, if there is a catastrophic failure,…

Continue ReadingWhen Hard Drives Fail

MediaStorm Guide to Editing 2.4 Anamorphic Video

Currently at MediaStorm, we are using the Sony PMW-F5 camera. Our final frame size is 2048×858, also known as 2.40.

This more cinematic look is longer in width but shorter in height than the standard HD size of 1920×1080.

Though our final output is 2048×858, the captured frame size is actually a bit larger at 2048×1080. This allows for more wiggle room when deciding what stays in the shot. There’s more latitude as you can now position the frame up or downwards without having to up-res its size.

The MediaStorm 2.4 Editing Workflow

To begin, you’ll need to download the 2.4 crop-bars mask.

It is sized for 2048×1080, your capture size, but masks out the top and bottom so that only the final output frame size of 2048×858 is viewable.

This file should be placed on your top video track. Then lock it in place by clicking the lock icon.

Now you can reposition your video frame without inadvertently moving the mask.

(more…)

Continue ReadingMediaStorm Guide to Editing 2.4 Anamorphic Video