Sometimes the most difficult challenge regarding subtitles is deciding whether to use them or not.
Subtitles present obvious aesthetic challenges—from inevitably covering the most important part of an image to turning a visual experience into a written one. If at all possible, avoid them; the obvious exception being when someone speaks a language other than that of the intended audience. Then subtitles are essential.
So how do you know if you need English subtitles for someone speaking English? It’s often difficult for a producer to make this call. After listening to the same clips again and again, we learn a speaker’s cadence and nuances and they become clearer to us. Probably the best method to make this determination is to play your project for a group of people who haven’t seen it yet and see if they can understand the narration without subtitles.
With fresh ears, they’ll quickly let you know if they’re able to follow along. If there’s any confusion, use subtitles; the most captivating visuals are useless if your audience can’t understand what’s going on.
Here are some other subtitle guidelines you may find useful:
- Keep all of your subtitles on the same video channel in Final Cut. No other graphic or video elements should be on that channel. Just subtitles. This will help your organization and make things much easier when you need to add a drop shadow, which I will discuss later.
- Avoid fonts with serifs, particularly small ones. Serifs tend to fall apart when a project is compressed to smaller dimensions. MediaStorm’s style is to use 18pt Arial bold.
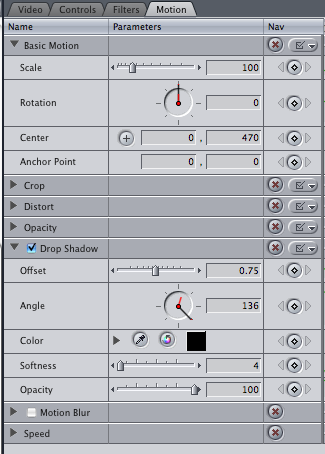
- Drop shadows are imperative. They help separate the subtitle text from images and video. To see their importance, place a drop-shadow subtitle above complex imagery. Now turn the effect on and off. The difference is striking. We use the drop-shadow settings below in Final Cut:
- When an image changes, so should the subtitle. Don’t let subtitles bleed over onto the next image, or you’ll create visual confusion as subtitles seemingly appear and disappear at random.
- Keep subtitles to one line only. Avoid wrapping them onto a second line as this, too, will create confusion when subtitles jump between one and two lines of text.
- If your subtitles do not fit on one line but your image remains the same, you’ll need to cut to a second subtitle. To do this, start the first subtitle when the image begins. Cut to the second subtitle approximately 10 frames before the next word is spoken. This way, you’ll retain the pacing of your narrator, and the drama of your project, by not revealing what’s said before you need to.
- At the beginning of a new cut, if there’s a pause of more than a second before someone speaks, fade up the subtitle with an eight-frame dissolve. The dissolve should complete approximately 15 frames, or half a second, before the person speaks.
- If you intend to broadcast your project, make sure your subtitles are broadcast-safe. To create broadcast-safe subtitles in Final Cut, from the top right pulldown menu in the Canvas window select Show Overlays Show and Show Title Safe. The title safe region is within the boundaries of the inner rectangle (when you are working in 16:9).
-
Make a subtitle template. Create one subtitle with the proper font, size, and drop shadow. Before using this as your template, though, turn off the drop shadow as it will cause extra rendering. Next, using option-drag, copy the subtitle block to its next location. Double-click the subtitle to load it into the Viewer window. Then, using your transcript, paste in the proper text.
When you have added all your subtitles, turn on the drop shadows on your first clip. Select it, then use the keystroke command-C to copy.
To paste the drop shadow on all the other subtitles, select the additional clips using the T tool. Then press option-V to paste the attributes. Select drop shadow from the pop-up window.
Learn more about our approach to producing multimedia by purchasing MediaStorm’s Post-production Workflow. Spanning more than 200 steps, the workflow covers every phase of editing, from organizing and editing assets in Final Cut Pro 7 through backing up and archiving your project. The workflow includes exclusive access to our Aperture Workflow and our Final Cut Asset Parser. Learn more about MediaStorm’s Post-production Workflow.

