
Color correction can dramatically alter the look of your footage. With just a few steps, you can transform washed out video into vibrant and rich imagery.
In most instances, color correction is best left for the end of the editing process. There are two reasons for this. First, there’s no need to correct footage until you know for certain it will be in the final project. Second, color correction often requires rendering, which can slow editing down to a standstill.
Setting Up
In Final Cut 7’s Window menu, select Arrange>Color Correction.
In the Timeline, select the video track that you’d like to color correct.
From the Effects menu, choose Video Filters>Color Correction>Color Corrector 3-way.
You can also drag the effect from the Effects window (command-5) and drop it on the clip.

Double-click the video clip containing the effect to open it in the Viewer.

Click the Visual button to open the 3-way Color Corrector.
(Sometimes you might discover that your Canvas does not update to reflect your color changes. If this happens you need to confirm that you’re working on the right file. To do this, double-click your video file in the Timeline once again. Then, open the Color Corrector 3-way tab. You will now be able to see any changes you make in the Canvas.)
Open Tools>Video Scopes.

In the left top corner make sure Layout is set to Waveform. This is the best monitor for viewing luminance values.
On the top left side of the Waveform monitor, click the small button with a histogram to reveal the Display Brightness Slider. Drag the slider to the right to reveal additional luminance values in the Waveform scope.
Luminance values are a measure of the amount of light in an image. In Final Cut’s waveform monitor, luminance values are represented by tiny white dots. By dragging the display brightness slider, you’re able to see more of the luminance values in the image.
Correcting Luminance
The Waveform monitor measures light. It does not evaluate color. Your white luminance values are at the top of the Waveform monitor. At the bottom are the black luminance values.

Black Levels
First make sure your black levels are correct. To achieve this, in the Color Corrector 3-way, click the left arrow of the black level slider.

As you do so, you’ll notice that the lines in the Waveform monitor move closer to the the black line.

You want the Waveform lines to barely touch the bottom black bar so that your image has a “true black.” If you’d like to “crush” the black colors further, continue to move the black slider to the left. Watch the Canvas for reference.
Click the right arrow to decrease your blacks, or shadows.
You can also drag the slider button for quicker, less incremental changes.

White Levels
After you’ve set your black levels, do the same with your white levels.
Follow the above steps again, this time using the white slider. To increase the whites, click the right arrow.
Unlike your black levels, it’s not necessary for your whites to reach the white line on the Waveform monitor. Instead, raise them until the highlights are slightly overexposed, then pull back.
To avoid clipping, make sure your white levels do not exceed 90 percent in the Waveform monitor.
You may notice that as you increase your white luminance values, the black luminance values begin to rise. If so, you should readjust the black, then the white values, in turn, to achieve the right setting.
Mid Levels
Finally, use the same steps as outlined for the black and white levels to adjust your mid levels. Adjust to taste. MediaStorm tends to correct with darker mid levels.
To recap:
- First, set your black levels
- Next, set your white levels
- Recheck your black levels, make sure they are still correct
- Set your mid-levels
Correcting Chroma
Unlike luminance which is the lightness of your image, chroma measures color. To color correct video, we’ll use the three color wheels of the Color Corrector 3-way filter, and the Parade Monitor.
Parade Monitor
In the layout drop down, select Parade.

The Parade monitor allows you to see how much red, green or blue is in the white, midtones and blacks of your image.

The Parade monitor also gives you an easy way to spot color balance issues quickly and precisely.
In the example below, there are more green chroma values in the white levels. This means the highlights of the image have more green in them than red or blue. The opposite color of green is magenta. Thus, in order to make the whites more neutral, you would add magenta to the whites.

Look for similar color bias in the midtones, and blacks, then adjust the image using the 3-Way Color Corrector (discussed below), to achieve a more neutral image.
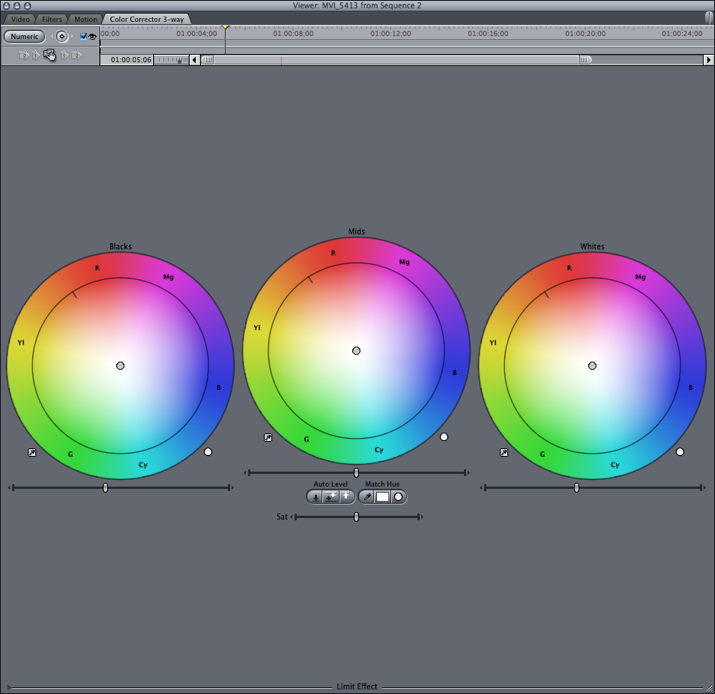
3-Way Color Corrector Interface and the Eye Drop Tool
There’s an individual color wheel for blacks, mids and whites. In relation to chroma, you might think of them as shadows, mids, and highlights.

Surrounding each wheel is a series of abbreviations. Starting at the top and moving clockwise, they stand for: red, magenta, blue, cyan, green and yellow.
The eyedropper tool allows you to select a specific portion of your image that best represents true white, black or gray (midtone). Final Cut Pro will then readjustment the color automatically.
To do this, click the eyedropper icon to the right of the wheel. For this example, we’re using the whites eyedropper.

Next, in the Canvas, click the portion of the image you’d like to be white. Final Cut Pro will adjust the color wheel accordingly.
Repeat this process for your black and mid levels as needed.
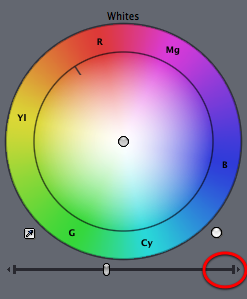
If you go too far afield and would like to reset a color wheel, simply click the button to the lower right (see below).

The eyedropper is an imperfect tool. Don’t expect Final Cut to make a perfect correction. This is about getting a good starting point. Often the eyedropper will over correct for color bias. You’ll almost always need to readjust the correction manually.
Manual Color Correction
Before you begin manual color correction,take a look at the Parade monitor and the Canvas. Determine where you need to make your corrections. Is there too much magenta in the whites? (Add green to the whites to counter that.) Are the shadows too blue? (Add yellow to the blacks to correct that.)

Note the knob at the center of the color wheel. It’s currently in the neutral position. If you’d like more red in the highlights of your video, drag the knob towards the R. If you’d prefer less red in your highlights, do the opposite.
The knob moves very slowly. That’s because even slight changes here can have a drastic effects on the tone of your video. If, however, you’d like to speed up how quickly the knob moves, simply hold the shift key as you drag.
To recap:
- First, turn on the Parade monitor and Canvas to spot color bias in specific areas of the image.
- Use the eye dropper to set initial color balance in whites, midtones and blacks.
- Recheck the Parade monitor and Canvas to spot color bias in the image.
- Use the color wheels of the 3-way Color Corrector to manually adjust color.
Don’t expect miracles. Compressed video is much more difficult to color correct than RAW still photographs. If your video was shot with an incorrect white balance, you probably won’t be able to remove all of the offending color with Final Cut’s tools alone.
Copying Filter Settings Between Clips
When you’re happy with the color correction of one clip and think it may work for another–in an interview, for example–Final Cut Pro offers an easy solution to copy and paste your settings.
In the Timeline, select the clip with the filter settings you’d like to copy. Press command-c to copy it.
Then, select the clip you’d like to color correct. From the Edit menu, choose Paste Attributes or option-v.

From the popup window click Filters.
Doing this will paste your Color Correction 3-Way filter on to the new clip. Note: This will also paste any other filters that happen to be on the first clip as well.
Broadcast Projects
If your project is intended for broadcast, you’ll need to add a Broadcast Safe filter. This filter ensures that your whites are “legal.” No matter how high you boost them in the 3-way Color Corrector, they will not exceed 100 percent.
Select all of your clips in the Timeline. Then, from the Effects>Video Filters menu choose Broadcast Safe.
More to Learn
This guide provides just the beginning steps toward understanding color correction. Learning to grade video can be a journey as rich and as deep as learning to edit.
Here are some additional links to start you on your path:
Final Cut Pro 7 Color Correction
How to Read Scopes
http://www.larryjordan.biz/technique-how-to-read-scopes/
PowerUP Tutorial 33: Color Correction to Fix Problem Clips
http://www.larryjordan.biz/app_bin/Store/catalog/product_info.php?products_id=134
Final Cut Pro X Color Correction
A Free Fifteen Part Course On Color Grading within FCPX
http://www.fcp.co/final-cut-pro/tutorials/477-a-free-fifteen-part-course-on-color-grading-within-fcpx
Color Correction in Final Cut Pro X (lynda.com)
http://www.lynda.com/Color-tutorials/Correction-in-Final-Cut-Pro-X/83097-2.html
Color Theory
Color Theory for Designers, Part 1: The Meaning of Color
http://www.smashingmagazine.com/2010/01/28/color-theory-for-designers-part-1-the-meaning-of-color/
Simple, Practical Color Theory
http://www.tutorial9.net/articles/design/simple-practical-color-theory/
Other Resources
The Tao of Color
http://www.taoofcolor.com/
Color Grading Central
http://www.colorgradingcentral.com/
Thanks to Tim McLaughlin for additional writing and assistance with this post.
Learn more about our approach to producing multimedia by purchasing MediaStorm’s Post-production Workflow. Spanning more than 200 steps, the workflow covers every phase of editing, from organizing and editing assets in Final Cut Pro 7 through backing up and archiving your project. The workflow includes exclusive access to our Aperture Workflow and our Final Cut Asset Parser. Learn more about MediaStorm’s Post-production Workflow.