Final Cut Pro’s Autosave Vault is your insurance policy against crashes, lost work and just about any other mishap. In short, it will save your bacon.
The vault works by saving an entire copy of your Final Cut Pro project file at a regular, user-determined interval.
This post will explain how to set up your Autosave Vault, copy items from a backup to your working project as well as replace your FCP file with a backup file.
Setting Up the Autosave Vault
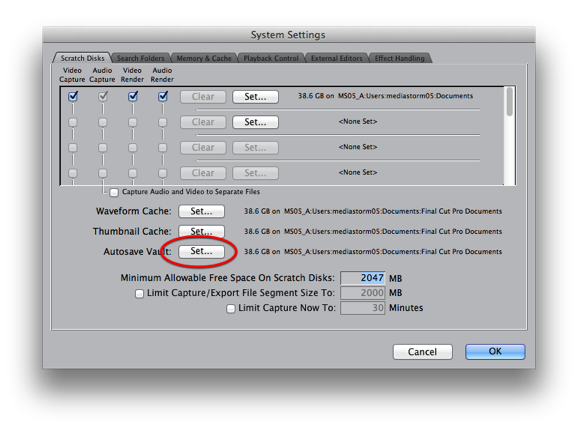
From the Final Cut Pro menu choose System Settings (Shift-Q).

Click the Autosave Vault: Set… button.
Select a directory to save your backup files. It’s important to set your backups to a different drive than your actual assets. That way, if your media drive dies you still have access to these files.
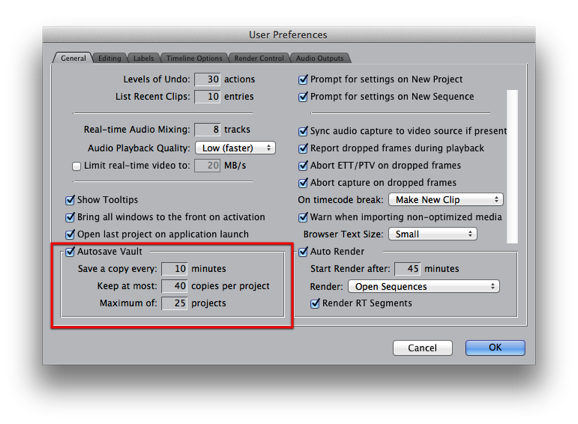
Next, from the Final Cut Pro menu choose User Preferences (Option-Q).

On the General tab, check the Autosave Vault checkbox to turn the vault on.
MediaStorm saves a new backup every 10 to 15 minutes. This way, if there’s a problem we’ll lose only a few minutes of work.
The Keep at most option, determines how many backup files FCP will save. Once Final Cut has reached the maximum, it will begin to delete the oldest files.
Copying Items from a Backup to Your Working Project
Sometimes you may need to copy just a sequence or two from a backup file to your main FCP project.
To do this, make sure your working FCP project is open.
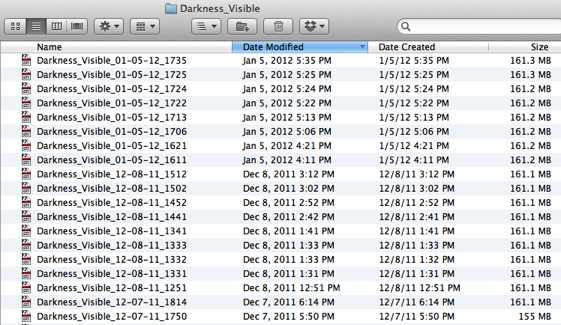
Then, open your Autosave Vault in the Finder. Each file is labeled with your project name and a timestamp.
You should now have two projects open in the Final Cut Browser window.
Though Final Cut Pro renames your backup file with a timestamp, it does not alter the sequences or file names inside. Therefore, when copying between projects it’s very easy to get confused as to which project you are actually working in.
To avoid confusion, in the Browser, drag the backup project window next to your main project so they are side-by-side.
To copy between projects, simply select an item in the backup and press command-c to copy it. Next, select your working project and press command-v to paste the item(s) into your project.
You can drag-and-drop between files but we’ve found that copy-and-paste tends to be faster and more reliable, particularly with large sequences.
Save your work. Then, close the backup project.
Copying Items From a Backup Sequence to a Sequence in Your Working Project
Select the Timeline (command-3). Then, close any open sequences.
Double click a sequence from your working project.
Next, select the backup project you’d like to open. Add the suffix ‘backup’ to the sequence. This will avoid the confusion of opening two sequences with the exact same name.
Paste from your backup sequence to your working sequence.
Save your work. Then, close the backup project.
If necessary, delete your original sequence. Then, remove the ‘backup’ suffix from the replacement sequence.
Replacing Your FCP Project File with a Backup File
In the Finder, locate your project folder. Open the FCP folder inside and create a new directory labeled z_old.
Rename your FCP file with the appendix v1 for version 1, or the appropriate version number.
Move your FCP_v1 file into the z_old folder.

In the Autosave Vault, locate the FCP backup file you’d like to use to replace your current project file.
Remove the timestamp suffix and drag it to your project FCP folder.
Open your new Final Cut file.
Learn more about our approach to producing multimedia by purchasing MediaStorm’s Post-production Workflow. Spanning more than 200 steps, the workflow covers every phase of editing, from organizing and editing assets in Final Cut Pro 7 through backing up and archiving your project. The workflow includes exclusive access to our Aperture Workflow and our Final Cut Asset Parser. Learn more about MediaStorm’s Post-production Workflow.


