Why I’m Switching to Abobe Premiere, not Final Cut X

Editor's note: After seven years working with Apple's Final Cut Pro, we have decided to begin using the Adobe Production Suite. We were early adopters of FCP 7 and considered making the switch to FCP X. In the end, we felt more comfortable with Adobe's product than Apple's FCP X. We know that many people in the industry are struggling with the same decision, so our producers have agreed to share their reasoning for the switch. This post from Eric Maierson explains the overarching reasoning for the switch. Tim McLaughlin also posted with some details of his experiences editing in both FCP X and Premiere. These two posts are just the beginning. Our producers will continue to share their experiences with you on our blog. Also, they'll be posting Premiere shortcuts on a new twitter feed @PrProShortcuts. And stay tuned for the release of a new Post-production Workflow for Premiere that will…

Continue ReadingWhy I’m Switching to Abobe Premiere, not Final Cut X

MediaStorm Guide to Basic Color Correction in Final Cut Pro 7

Color correction can dramatically alter the look of your footage. With just a few steps, you can transform washed out video into vibrant and rich imagery. In most instances, color correction is best left for the end of the editing process. There are two reasons for this. First, there’s no need to correct footage until you know for certain it will be in the final project. Second, color correction often requires rendering, which can slow editing down to a standstill. Setting Up In Final Cut 7’s Window menu, select Arrange>Color Correction. In the Timeline, select the video track that you’d like to color correct. From the Effects menu, choose Video Filters>Color Correction>Color Corrector 3-way. You can also drag the effect from the Effects window (command-5) and drop it on the clip. Double-click  the video clip containing the effect to open it in the Viewer. Click the Visual button to open the 3-way…

Continue ReadingMediaStorm Guide to Basic Color Correction in Final Cut Pro 7

MediaStorm Guide to Final Cut Pro 7 Autosave Vault

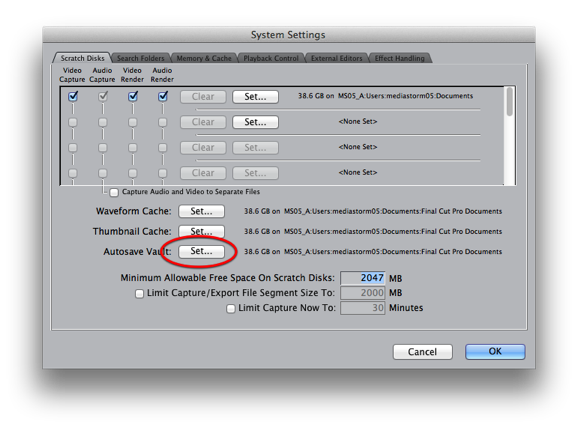
Final Cut Pro’s Autosave Vault is your insurance policy against crashes, lost work and just about any other mishap. In short, it will save your bacon. The vault works by saving an entire copy of your Final Cut Pro project file at a regular, user-determined interval. This post will explain how to set up your Autosave Vault, copy items from a backup to your working project as well as replace your FCP file with a backup file. Setting Up the Autosave Vault From the Final Cut Pro menu choose System Settings (Shift-Q). Click the Autosave Vault: Set... button. Select a directory to save your backup files. It’s important to set your backups to a different drive than your actual assets. That way, if your media drive dies you still have access to these files. Next, from the Final Cut Pro menu choose User Preferences (Option-Q). On the General tab, check the Autosave…

Continue ReadingMediaStorm Guide to Final Cut Pro 7 Autosave Vault

MediaStorm Now Using H.264 for Better Playback

When MediaStorm launched in 2005, video playback on the web was in its infancy. The best way to serve our projects was using Adobe’s Flash technology. Times change. Today, MediaStorm is excited to announce that we will encode all new projects using the H.264 codec. What this means is the quality of the files you’ll see in our new projects will be significantly better. They will also be larger. While our Flash files were encoded at 728 x 432 pixels, our new projects are 1280 x 720. Play the new workshop pieces Remember These Days or A Hundred Different Ways and you’ll see the difference, particularly in full-screen mode. Even better, the high-quality file you see on the internet will be the exact same file you’ll see on your iPad and iPhone. In conjunction with these changes, we’re also releasing two new white papers. The first, MediaStorm Compression Workflow: From Output to…

Continue ReadingMediaStorm Now Using H.264 for Better Playback

MediaStorm Guide to Archiving a Final Cut 7 Project

Note: This workflow follows the guidelines for setting up Final Cut Pro 7 found in Tips from the MediaStorm Final Cut Pro Workflow (see: Preliminary Setup, page 2 and Additional System Settings, page 11) After your project is complete and your output has been encoded, the next step is to archive your project. MediaStorm uses Mac Pro computers with four internal drives: one for the system software, one for project media, and one backup of each. When a project is complete, we remove the media drives and prepare them for archiving. Copying Your Files Copy your entire project folder to an external drive. (If you are already using an external drive that you intend to archive you can skip this step.) Make sure to include all of your media. The reason MediaStorm copies all files is, in part, because Final Cut Pro’s Media Manager is simply undependable. The other reason is safety. You…

Continue ReadingMediaStorm Guide to Archiving a Final Cut 7 Project