MediaStorm Guide to Adjusting Output Volume in Premiere Pro

This article is part of a series of posts with tips and tricks from our producers’ experience working with Adobe Premiere Pro CC after years of working in Final Cut Pro. To read more about why we made the switch, check out this post.


Let’s say you’ve mixed your audio and for whatever reason it’s consistently a little too low or a bit hot. Sure, you could return to your timeline and remix again, but that’s time consuming.

Premiere Pro 2014 offers a quick and elegant solution.

First, open the Audio Track Mixer. (Note that this is different from the Audio Clip Mixer.)

Open the disclosure triangle on the top left side.


(more…)

Continue ReadingMediaStorm Guide to Adjusting Output Volume in Premiere Pro

MediaStorm Guide to Nudging Audio in Premiere Pro 2014

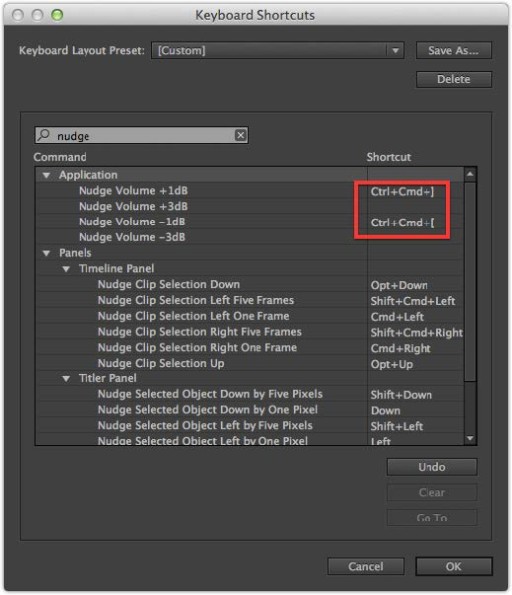
This article is part of a series of posts with tips and tricks from our producers' experience working with Adobe Premiere Pro CC after years of working in Final Cut Pro. To read more about why we made the switch, check out this post. A quick way to change your audio levels in Premiere Pro is to select a clip in the timeline and use the closed bracket ( ] ) to raise the volume or the open bracket ( [ ) to lower it. You can easily alter a group of clips this way by simply lassoing them first. Unfortunately, this method does not work in Premiere Pro CC if any of the audio contained key frames. This was a real limitation. Thankfully, with the introduction of Premiere Pro 2014, you can now nudge key-framed audio with a user-defined shortcut key. From the Premiere Pro menu select Keyboard Shortcuts… (Option-Command-K) Search…
Continue ReadingMediaStorm Guide to Nudging Audio in Premiere Pro 2014

MediaStorm Guide to Adding EQ Presence

This article is part of a series of posts with tips and tricks from our producers’ experience working with Adobe Premiere Pro CC after years of working in Final Cut Pro. To read more about why we made the switch, check out this post.


A few weeks ago at a family function, I started chatting with the guy running the soundboard. I asked how could I make the vocal audio sound better.

He said, all things being equal, the trick was to add 3 or 4 dB at about 3500 kHz.

I’ll walk you through how to do that in Premiere Pro.

First, from the Effects window, search for EQ.

Drag the effect on to the audio clip you’d like to change. Then, double click the audio selection so that it opens in the Source window.

In the Effects Control window you’ll see all of the EQ options.

(more…)

Continue ReadingMediaStorm Guide to Adding EQ Presence

MediaStorm Guide to Audio Configuration in Premiere Pro CC

This article is part of a series of posts with tips and tricks from our producers' experience working with Adobe Premiere Pro after years of working in Final Cut Pro. To read more about why we made the switch, check out this post. This screencast illustrates the basics of configuring your audio setting in Premiere Pro CC. Topics covered include: • How to set up your audio preferences for better importing. • The difference between single and dual track stereo files. • How to change a dual track stereo file to a single track stereo file. • How to mirror your strongest audio signal on both left and right channels.

Continue ReadingMediaStorm Guide to Audio Configuration in Premiere Pro CC

#AskMediaStorm Answers Round 1: NGOs, Building Story Arc, and Don’t Forget the Room Tone!

This is the first in an ongoing series of question and answers with the MediaStorm staff. To ask a question for the next roundup use the twitter hashtag #AskMediaStorm or use the comment section below. We can’t promise we’ll answer every question (hey, we’ve got films to produce!). But if your question wasn’t answered this round there’s a chance you’ll be included next time. Stay tuned. 

This week’s questions are answered by Eric Maierson and Tim McLaughlin.


Working with NGOs: Do you have your own people looking for characters, or do you trust the local NGO staff? #AskMediaStorm –@tatublomqvist

Eric: It’s actually a bit of both. Sometimes organizations are very specific about who they’d like us to interview and sometimes they know the story they’d like to tell but don’t have a specific person in mind. In the latter case, our Director of Photography Rick Gershon will talk with people in the community and then decide who best embraces the NGO’s goals. It’s important to remain flexible and open when making these decisions.

Tim: I’ll add that Rick often interviews dozens of potential subjects before choosing someone. These short “pre-interviews” give him a greater sense of who might best represent the story of the NGO, or more importantly, who has the best story to tell.

Using (or not using) panning/zooming on stills: When, why and how much? – @colinelphick

Eric: The writer Elmore Leonard once wrote in regards to exclamation points, “Keep your exclamation points under control. You are allowed no more than two or three per 100,000 words of prose.”

I think of pans and zooms similarly. Two or three times per piece is plenty, generally speaking.

Tim: I wholeheartedly agree with Eric on this. But that being said, when I do use these techniques, I use them for a reason. If I zoom in on an image, it’s often because I want the viewer to both listen to what’s being said in the interview (not changing visuals allows the viewer more opportunity to listen to the narrative), or I want them to spend time with a specific image. Panning, for me, is used to slowly reveal new information visually, or to continue the flow of a visual sequence. If, for instance, the camera is moving from left to right in the preceding video clip, I might use a pan moving from left to right in the next shot to continue the visual flow. This isn’t a rule (there aren’t any rules really), but it’s something I do from time to time.

What is the most important thing to remember when editing a multimedia? – @TorsteinBoe 

(more…)

Continue Reading#AskMediaStorm Answers Round 1: NGOs, Building Story Arc, and Don’t Forget the Room Tone!