
This article is part of a new series of posts with tips and tricks from our producers’ experience working with Adobe Premiere Pro after years of working in Final Cut Pro. To read more about why we made the switch, check out this post.
Today’s post was written by MediaStorm producer Eric Maierson.
If you’ve spent any time in Adobe Premiere Pro, you’ve probably noticed the various colors above the timeline.

According to Adobe’s help pages they can be decoded as follows:
Green: There are preview files available for this section that will be used during playback. Playback will be in real time.
Yellow: There are no preview files available for this section. These sections will render just before the playhead reaches them. Playback will probably be in real time.
Red: There are no preview files available for this section. These sections will render just before the playhead reaches them. Playback will probably not be in real time.
None: There are no preview files available for this section but the codec is simple enough that they are not required. Playback occurs directly from the source media and will be in real time.
These color cues also allow you to render sections with greater discernment. To render just a selection, drag your work area markers over the appropriate clip, or use the shortcuts Option-[ and Option-] to mark an in and out point, respectively.

Next, choose Sequence > Render Effects in Work Area or press the Enter key. Premiere will render all red sections.
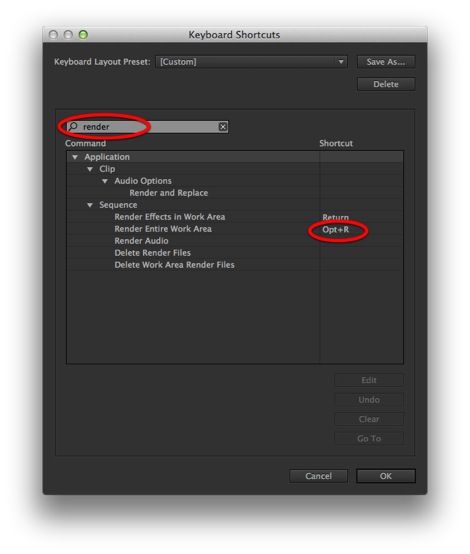
There is no built in keyboard shortcut to render the entire work area so I created one by selecting Premiere Pro > Keyboard Shortcuts…

In the pop-up menu search for Render Entire Work Area. I used the familiar Final Cut shortcut Option-R. This will render both red and yellow areas. (For other tips on using shortcuts in Premiere see this post.)
Storing Preview Files
Each time you start a new project, Premiere Pro allows you to set a location for these render—or preview—files.
In the New Project window select the Scratch Disks tab.

You’ll notice that the location for all previews is set to Same as Project. This means that the render previews will be stored in the same location as your Premiere Pro file.

If you need to change the location of your scratch disks use Project > Project Settings > Scratch Disks… Note that this only changes the location of future preview files, not files that have already been created.
To delete render files, make sure your timeline is selected then choose Sequence > Delete Render Files. This will delete all render files associated with your entire project.
To learn more about how our producers are using Adobe Premiere Pro see our other blog posts on the topic. Also, follow our producers’ twitter feed @PrProShortcuts for Premiere shortcuts.
To learn more about our production style, you can purchase a copy of our Post-production Workflow. Readers who purchase our current Final Cut Pro and Aperture workflow automatically receive the Premiere workflow when it is released.
MediaStorm offers several online and in-person training opportunities at mediastorm.com/train.
Have you made a recent switch in your editing software? Let us know about it in the comments below.