This article is part of a series of posts with tips and tricks from our producers’ experience working with Adobe Premiere Pro CC after years of working in Final Cut Pro. To read more about why we made the switch, check out this post.
Adiós Aperture
Apple recently announced its plans to retire both Aperture and iPhoto. The company will create one unified application, titled Photos, that will be part of OS X Yosemite.
While Yosemite will continue to support Aperture, as well as provide an upgrade path for Photos compatibility, development of Aperture will cease. (It’s worth noting that the last major upgrade to Aperture was version 3.5, released in October 2013.)
Aperture users are left with three basic options:
- Continue to work in Aperture, in the same manner that some still use Final Cut Pro 7.
- Adopt Photos in to their workflows when it becomes available.
- Use an alternative application like Adobe’s Lightroom.
While some suggest that Photos will be a powerful replacement for iPhoto and Aperture, Macworld author David Sparks states, “The desktop Photos app likely won’t offer all the power that currently exists in Aperture; I’m certain its photo-alteration tools will take a hit.”
I hope that’s not the case. Nevertheless, MediaStorm is now considering adopting Lightroom in to our post-production workflow.
Why We Haven’t Used Lightroom Previously
Aperture allows users to drag a RAW image straight from the application in to the Premiere Pro timeline. It does this by creating a JPEG preview of all assets on import. That JPEG lives within the bowels of the Aperture file system and must be replaced prior to your final export, otherwise the color will look washed out. Aperture JPEG previews are created with an Adobe 1998 profile, while Premiere Pro images should use sRGB.
The problem with Lightroom is that while you can drag a JPEG to the Premiere Pro timeline, you can not do the same with RAW files. This is because Lightroom references your actual original image, not a generated preview.
In other words, once you’ve dragged an image from Lightroom to Premiere Pro, you can right click on it, choose Reveal in Finder… and you will see the actual file in the Finder.
![]()
Compare this to an image dragged from Aperture.
![]()
An Elegant Solution
In light of Apple’s announcement, I spent some time with Lightroom 5 in order to find a way to drag RAW files in to the Premiere Pro timeline.
The bad news is that you still have to export a JPEG and then reimport it. The good news is there is an easy and automated solution.
In Lightroom choose the File > Export… menu (Command-Shift-E).
You’ll then see the Export Dialogue window with its many options.
In the Export Location section, choose:
- Export to: Same folder as original
- Existing Files: Ask what to do
- Make sure Add to This Catalog is selected as well as Add to Stack: Below Original
This ensures that exported JPEG files are automatically re-imported in to your Lightroom catalog adjacent to the original RAWs. This way you don’t have to hunt for the new image. It’s just there, ready for you to put in the Premiere Pro timeline.

Next, in the File Settings section, choose:
- Image Format: JPEG
- Color Space: sRGB
- Quality: 100.

Finally, in the Image Sizing section, select:
- Resize to Fit: Width & Height
- W: 2880 H: 2880 pixels
- Resolution: 72
- Select the Don’t Enlarge button
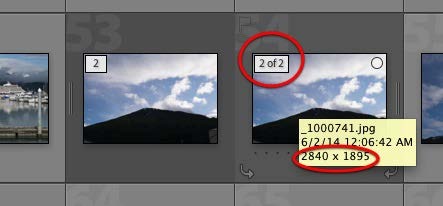
The reason we output to 2880 is that it’s one-and-a-half the size of 1920 (HD). That way you can add keyframes to zoom in on an image and not lose resolution.

Once complete, create an export preset by selecting Add at the bottom right of the window.
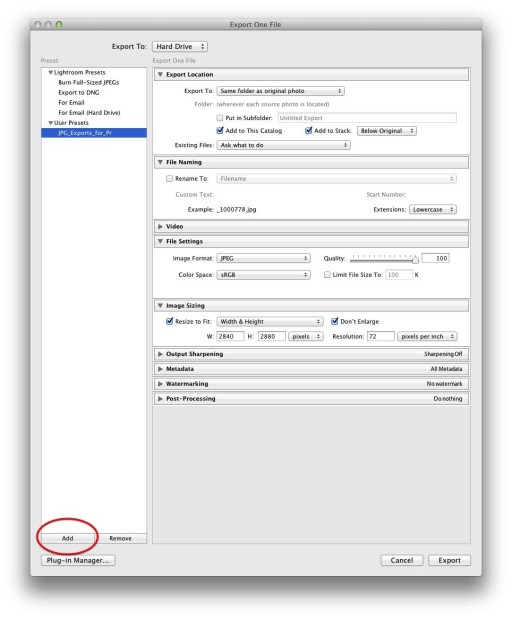
Name your new setting something like JPG_Exports_for_Pr.
Workflow
Now, when you want to use a RAW image in your Premiere Pro timeline simply select the RAW image you’d like to use, right-click and choose Export > JPG_Exports_for_Pr .
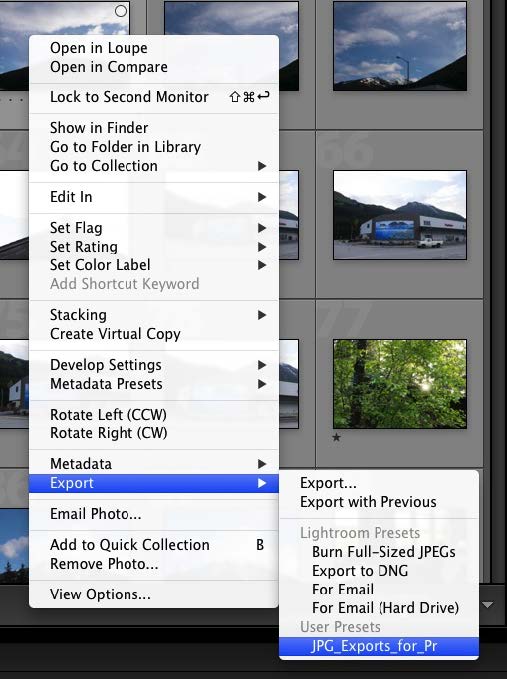
A new JPEG version will be exported then reimported right next to your original file. You can then simply drag into the Premiere Pro timeline.
Replacing JPEGS In The Timeline With Toned Images
Once your edit is complete, you’ll most likely need to replace the JPEGS in your timeline with toned ones.
This is easier in Lightroom than it was in Aperture. Because Lightroom references the actual image and not a preview, we simply need to replace our previously exported JPEG with a color-corrected version.
To do this, tone your RAW image in Lightroom, or another external editor (Lightroom>Preferences>External Editing).
Then, right-click and from the pop-up menu select JPG_Exports_for_Pr.
A warning window will appear.
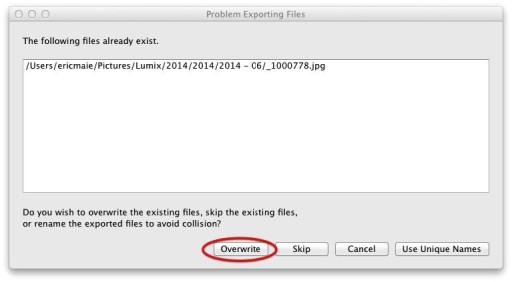
That’s because the file already exists, i.e., my previous export, and I’ve told Lightroom’s export module to ask me what to do in the case of an existing file.

Choose Overwrite. Your new toned JPEG will replace the old one in the Finder and will also automatically update in the Premiere Pro timeline.
Additional Thoughts on Picture Cropping in Premiere Pro
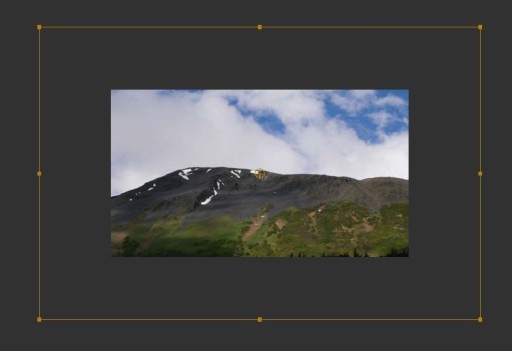
Normally, when you drag an image into your timeline, Premiere Pro will fill the frame so that it’s scaled to 100%.
You can see this by double-clicking the image in the timeline so that it loads into the Source window. Click the Effects Control pane then twirl down the triangle adjacent to Motion.

In the Program window, you’ll see the rectangular bounding box that shows the unseen portion of your photograph.

In, most cases this means you’ll need to finesse the crop as a good portion of your image is not readily visible.
Premiere Pro offers an alternative viewing method that allows you to see the whole image in the Program window.
In the Premiere Pro menu choose Preferences > General.
Then, click Default scale to frame size.
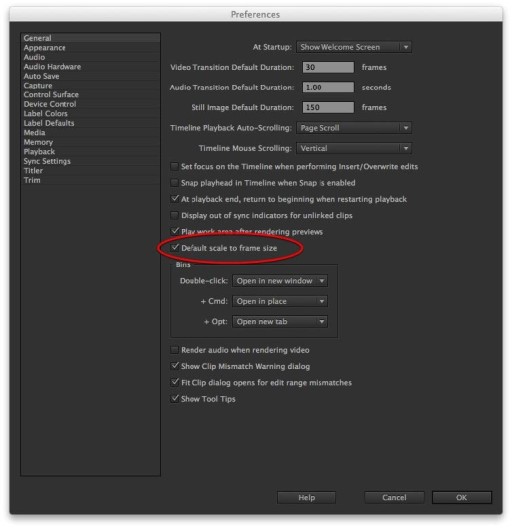
Now when you place an image on the Premiere Pro timeline you’ll see the entire image.
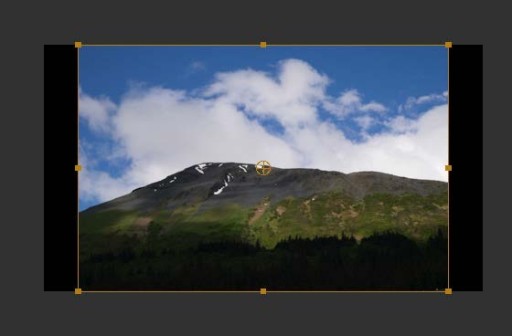
Here’s where it gets a little wonky. If you double-click the same image in the timeline then look at the Effect Control, you’ll see that it’s scaled to 100%. But in this case the actual image is larger than the 1920 pixels of my sequence setting.
If I increase its size, the percentage will exceed 100%. So what’s happening? Is Premiere Pro upsizing my image? Will it be pixelated if I increase its size? The answer is, I don’t think so. I exported my image and saw no degradation.
The challenge with this method, however, is that because the scale count is apparently off, it becomes difficult to precisely know the scale of your image. If you exported at 2880 as described above than, you are safe to increase the scale to 150%.

