This article is part of a series of posts with tips and tricks from our producers’ experience working with Adobe Premiere Pro CC after years of working in Final Cut Pro. To read more about why we made the switch, check out this post.
In the first part of this tutorial, I showed you how to sync multiple camera angles and audio sources using Red Giant’s $199 PluralEye’s 3.0. After you’ve imported the XML file generated by PluralEyes into Premiere Pro CC and your tracks are in sync, it’s time to create a multi-camera sequence.
First though, because PluralEyes offers no audio configuration options like stereo vs.mono, or which tracks to duplicate for stereo pairs, you’ll need to make sure your audio is set up properly. See the screencast MediaStorm Guide to Audio Configuration for assistance.
As a general rule, I use the better audio source and double it so I now have a stereo pair.
MULTI-CAMERA SEQUENCE
A multi-camera sequence appears in your timeline as one clip, but bundles multiple camera angles together so that you can easily see all available options as you edit.
To create a multi-camera sequence, first create a new empty sequence (Command-N). Next, drag your synced sequence from the Project window into this one. Putting one sequence inside another is referred to as a nested sequence.
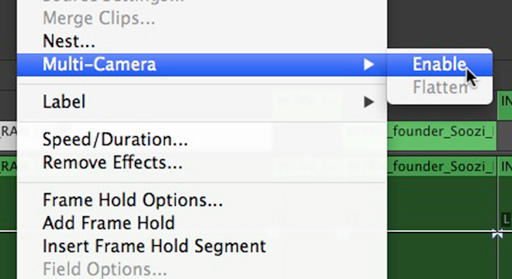
Rename your new sequence ProjectName_InterviewName_multiclip_RAW. Still in the timeline, right-click your sequence and select Multi-Camera > Enable.
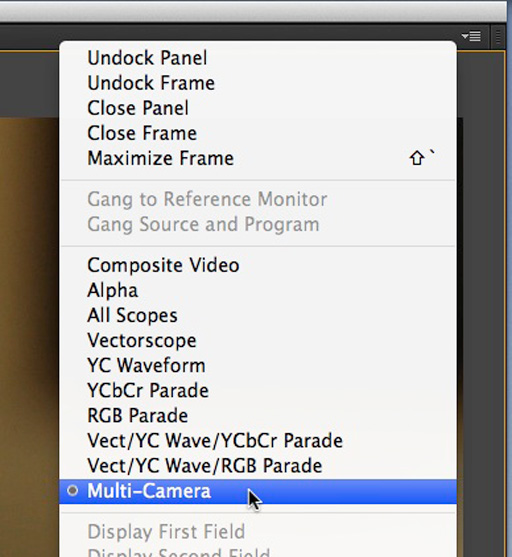
From the dropdown menu at the top of the Program monitor choose Multi-Camera.
Now you will see each camera angle available to you. Shuttle your playhead across the timeline and you’ll see changes in the multi-camera window. Be aware that this requires more power from your computer as you are doubling the number of video streams it must process. You can turn off this view and still retain basic multi-camera functionality–you just won’t be able to see both camera options simultaneously.
SWITCHING VIDEO
To switch angles in your sequence, make sure your playhead is over the part of the sequence you’d like to change. Next, simply double-click a camera view in the Multi-Camera monitor. Your sequence will update to the new angle.
To change just a small section of your multiclip, make sure you first have an edit mark (Command-Shift-K) on either side of your clip.
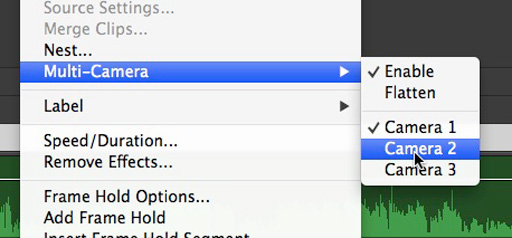
You can also change angles in the timeline. Right-click the multiclip and choose Multi-Camera > Camera [number].
Finally, you can also use the top row of numbers on your keyboard (not the keypad) to switch between angles. Camera 1 starts at the upper left corner and moves horizontally.
SWITCHING AUDIO
Generally I don’t have a need to switch between audio channels in a two-camera shoot as I’ve already prepared the better audio before starting.
If you are using Premiere Pro 6, note that when you nest your original PluralEyes sequence in order to create a multi-camera sequence, you will no longer be able to see its waveform. This should not, in theory, be an issue in CC. One work around is the following:
- Create your nested sequence.
- Enable Multi-Camera.
- Paste the configured audio from your original sequence into the multi-camera sequence. To ensure you’re in sync, simply play both the audio export and the multiclip together. If they’re lined up properly, there will be no echo.
- Once you’re satisfied, delete the nested audio.
Have a Premiere Pro question? Use the Twitter hashtag #askMediaStorm.
To learn more about how our producers are using Adobe Premiere Pro see our other blog posts on the topic. Also, follow our producers’ twitter feed @PrProShortcuts for Premiere shortcuts.
To learn more about our production style, you can purchase a copy of our Post-production Workflow. Readers who purchase our current Final Cut Pro and Aperture workflow automatically receive the Premiere workflow when it is released.
MediaStorm offers several online and in-person training opportunities at mediastorm.com/train.
Have you made a recent switch in your editing software? Let us know about it in the comments below.


