
This article is part of a new series of posts with tips and tricks from our producers’ experience working with Adobe Premiere Pro after years of working in Final Cut Pro. To read more about why we made the switch, check out this post.
Today’s post was written by MediaStorm producer Eric Maierson.
There’s a critical difference between the title tool in Final Cut Pro and Adobe Premiere Pro. In FCP, one could slice a title that’s already in the timeline, open it in the Viewer window, then change the contents so that you now had two distinct titles.
This does not work in Premiere Pro.
In Premiere Pro each title is a distinct instance. So, if you splice a title in the timeline then change its content, you will also change the content of the first title as well. Both titles will say the same thing.
The only way around this is to create a new title instance for every subtitle. It’s a cumbersome process and one that we wish Adobe would change.
Setting Up a Title Template
In the Project window create a new bin (Command – /). Name it Subtitles.
Open the title tool (Command-T).
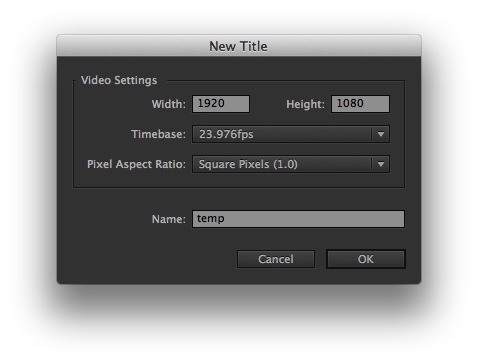
In the New Title window, name the title temp. The title size will default to your current sequence size.

When the title tool opens, press T for the Type Tool, then click inside the rectangle. Use 38pt Arial, then type a short phrase. If you plan to use drop shadow, and you should, add it here as well. (Tim McLaughlin will follow up this post with a more detailed look at the functionality of the Title Tool.)
Next, click the Selection tool (arrow icon) and move the title so that it rests on top of the title-safe line.

Use the Horizontal Center tool to align the title in the middle of the screen.

Close the title tool.
Drag the title from Project window to your Timeline.
To create a new title, simply click the New Title Based on Current Style button at the top right of the Title tool.
![]()
XML
At MediaStorm we no longer use burned-in timecode. We use XML to generate titles in our player.
If you plan to use XML with your subtitles for any reason, say to copy from one computer to another, the following steps are crucial:
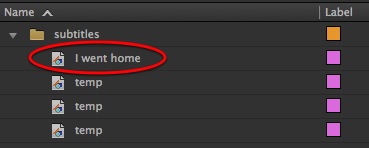
Each time you paste a phrase from your transcript into a subtitle, you must also rename the subtitle instance with the exact same phrase.
If the contents of the subtitle is “I went home” the name of the subtitle instance must also be “I went home”; the names must match identically. That’s because XML in Premiere Pro reads the name of the title, not its contents.
Here too, we wish Adobe would change this behavior so that XML functioned as it does in Final Cut Pro 7, reading the content of the subtitle, not the name of the title file – the opposite of how it works now.
It’s obviously more expedient to avoid this extra step.
Subtitle Styles
Font Size – 38
Font – Arial
Drop Shadow – Standard effect, change opacity to 90%
Fades
If narrative is more than 15 frames from the end or beginning of a cut, set subtitle to start 10 frames before the start or end of narrative, then place 8 frame fade on subtitle.
To learn more about how our producers are using Adobe Premiere Pro see our other blog posts on the topic. Also, follow our producers’ twitter feed @PrProShortcuts for Premiere shortcuts.
To learn more about our production style, you can purchase a copy of our Post-production Workflow. Readers who purchase our current Final Cut Pro and Aperture workflow automatically receive the Premiere workflow when it is released.
MediaStorm offers several online and in-person training opportunities at mediastorm.com/train.
Have you made a recent switch in your editing software? Let us know about it in the comments below.